^ 关注我,带你一起学GIS ^
注:当前使用的是 ol [9.2.4] 版本,天地图使用的key请到天地图官网申请,并替换为自己的key
 前言
前言
❝
OpenLayers中,样式类很强大,填充、描边属性也很全面,但是你有没有疑惑在设置样式的时候,一会儿使用style,一会儿又使用setStyle;同样的一个image属性,一会儿是Icon,一会儿是Circle。为什么会是这样,本文将进行详细解答。
1. Style对象介绍
首先看官网的描述: 翻译过来意思就是说作为【矢量要素渲染样式的容器,通过
set*()方法对样式或其子项所做的任何更改都不会生效,直到重新渲染使用该样式的要素或图层为止】。再翻译一下就是调用**set*()**方法后,还要重新渲染图层。
详见文章【OpenLayes 图文标注大全】:
这就是例子中为什么在调用set*()方法后,再执行changed()的原因。
2. Style对象使用介绍
通过上节介绍已经了解了Style是用于渲染矢量要素图层,那么在矢量图层中肯定是可以使用Style的,还有就是在要素类中通过setStyle方法设置样式。
矢量图层样式
直接使用Style对象
const vectorLayer = new ol.layer.Vector({
    source: vectorSource,
    style: new ol.style.Style({})
})
函数返回Style对象
const layer = new ol.layer.Vector({
    source: new ol.source.Vector({
        features: (new ol.format.GeoJSON()).readFeatures(result)
    }),
    style: function (feature) {
        return style
    }
})
要素类样式
传入Style对象
const vectorPoints = new ol.layer.Vector({
    source: new ol.source.Vector({
        features: new ol.Collection(
            features.map(feat => {
                feat.setStyle(new ol.style.Style({}))
                return feat
            })
        ),
        format: new ol.format.GeoJSON()
    })
})
传入Style数组对象
const iconStyle = new ol.style.Style({
    image: new ol.style.Icon({
        src: "../../image/label/map.jpg",
        scale: [1 / 16, 1 / 16],
        color: "red"
        anchor: [0.5, 1.25]
    }),
})
const featureStyle = new ol.style.Style({
    image: new ol.style.Circle({
        radius: 10,
        fill: new ol.style.Fill({
            color: "#fff"
        }),
        stroke: new ol.style.Stroke({
            color: "red"
        })
    })
})
feature.setStyle([iconStyle, featureStyle])
3. Style对象属性介绍
Style对象属性很多,包括fill、stroke、zIndex等,因为这几个属性比较简单,所以本文主要介绍geometry、renderer、hitDetectionRenderer、image和text属性。
名称 | 类型 | 描述 |
| string | Geometry | GeometryFunction | undefined | 特征属性或几何图形或函数返回要为此样式渲染的几何图形。 |
| Fill | undefined | 填充样式 |
| ImageStyle | undefined | 图像样式 |
| RenderFunction | undefined | 自定义渲染器。配置后, |
| RenderFunction | undefined | 用于命中检测的自定义渲染器。如果提供,将用于命中检测渲染。 |
| Stroke | undefined | 描边样式 |
| Text | undefined | 文本样式 |
| number | undefined | Z index |
3.1. geometry属性
geometry简单理解就是要渲染的几何图形。
const layer = new ol.layer.Vector({
    source: new ol.source.Vector({
        features: (new ol.format.GeoJSON()).readFeatures(result)
    }),
    style: function (feature) {
        const label = feature.get("name").split(" ").join("n")
        labelStyle.getText().setText(label)
        if (label === "昆明市") {
            const targetGeometry = feature.getGeometry()
            labelStyle.setGeometry(targetGeometry)
        }
        return style
    },
    declutter: true
})
在Style对象中设置了渲染几何对象之后,如上矢量图层就只会标注目标几何图形。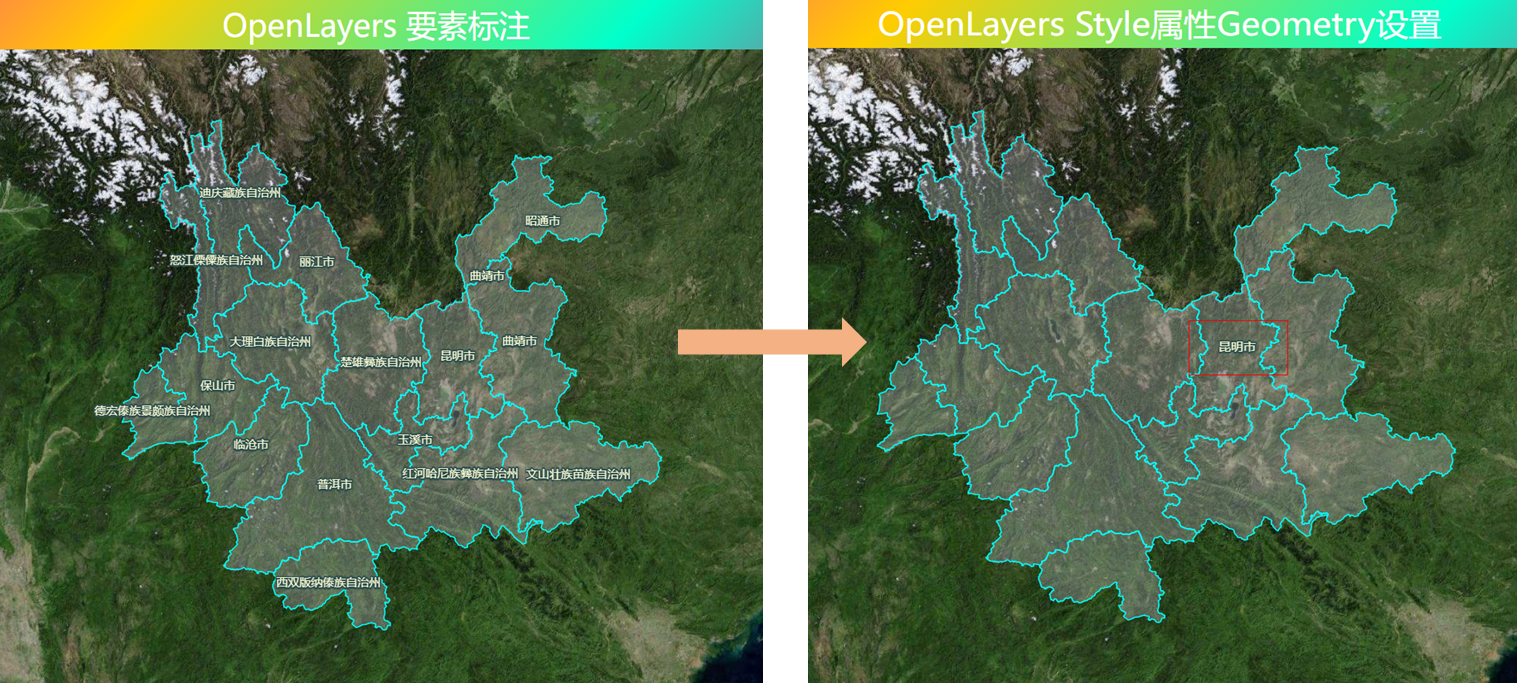
3.2. renderer属性
renderer作为Style对象的一个属性,是RenderFunction类型,也就是一个渲染函数。这个方法具有两个参数
coordinates:GeoJSON格式的Geometry对象像素值坐标。State:图层渲染器状态对象。
详见文章【OpenLayes 自定义圆形渲染】:
circleFeature.setStyle(new ol.style.Style({
    renderer(coordinates, state) {
        // 解构坐标对
        const [[x, y], [x1, y1]] = coordinates
        // 获取canvas上下文对象
        const ctx = state.context

        // 计算x和y方向距离
        const dx = x1 - x
        const dy = y1 - y

        const radius = Math.sqrt(dx * dx + dy * dy)
        const innerRadius = 0
        const outerRadius = radius * 1.4

        // 创建径向渐变
        const gradient = ctx.createRadialGradient(
            x,
            y,
            //  innerRadius,
            10,
            x,
            y,
            outerRadius
        )
        // 添加渐变色带
        gradient.addColorStop(0, '#ff00cc')
        gradient.addColorStop(0.35, '#ffcc00')
        gradient.addColorStop(0.7, '#00ffcc')
        gradient.addColorStop(1, '#ff0066')

        // 开始绘制
        ctx.beginPath()
        // 创建圆形
        ctx.arc(x, y, radius, 0, 2 * Math.PI, true)
        ctx.fillStyle = gradient
        ctx.fill()

        ctx.arc(x, y, radius, 0, 2 * Math.PI, true)
        ctx.strokeStyle = '#ffcc00'
        ctx.stroke()
    }
}))

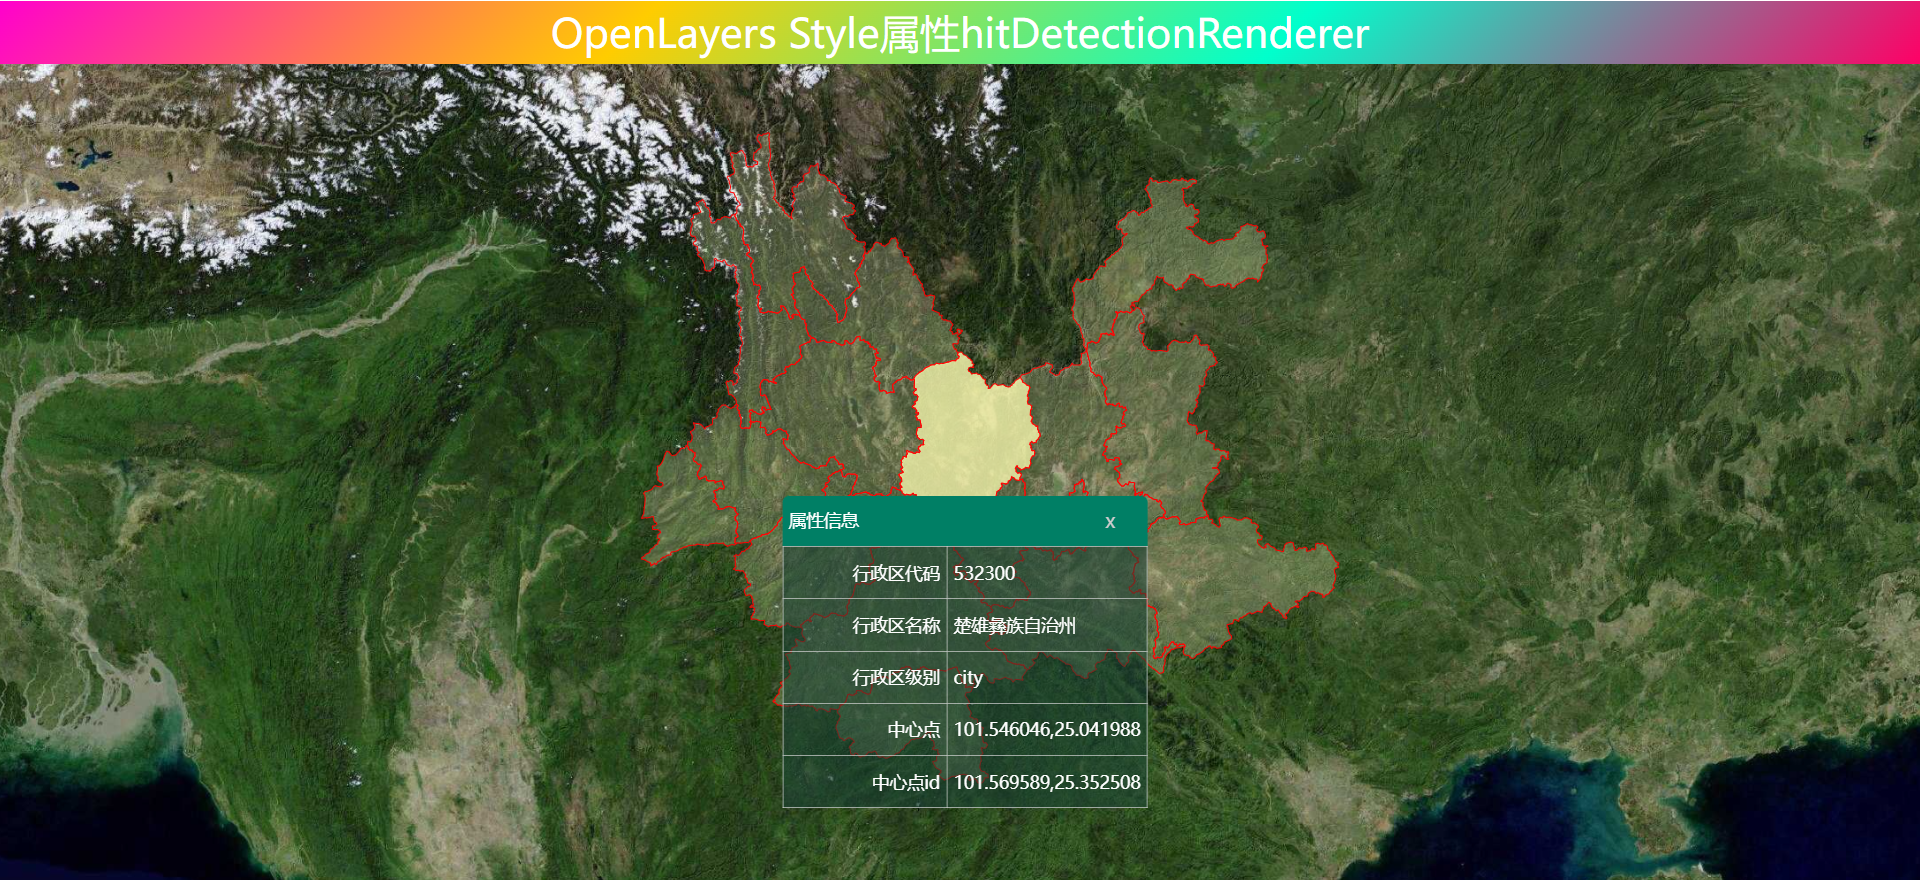
3.3. hitDetectionRenderer属性
hitDetectionRenderer和renderer属性一样,是一个渲染函数。用于命中检测的自定义渲染器。如果提供,将用于命中检测渲染。这个方法具有两个参数
coordinates:GeoJSON格式的Geometry对象像素值坐标。State:图层渲染器状态对象。
详见文章【OpenLayers 自定义渲染器(hitDetectionRenderer)】:
const layer = new ol.layer.Vector({
    source: new ol.source.Vector({
        format: new ol.format.GeoJSON(),
        features: new ol.Collection(
            features.map(item => {
                const feature = (new ol.format.GeoJSON()).readFeature(item)
                const properties = feature.getProperties()
                const label = properties.name.split(" ").join("n")
                feature.set('fill-color', fillStyle)
                feature.setStyle(new ol.style.Style({
                    renderer(coordinates, state) {
                        const ctx = state.context
                        renderFeature(ctx, coordinates, state.feature.get('fill-color'))
                    },
                    hitDetectionRenderer(coordinates, state) {
                        const ctx = state.context
                        const feature = state.feature
                        renderFeature(ctx, coordinates, state.feature.get('fill-color'))
                    }
                }))
                return feature
            })
        )
    }),
    declutter: true
})
3.4. image属性
Image类是Icon、CircleStyle和RegularShape的基类。也就是说,Image由Icon或者CircleStyle或者RegularShape来实现。
当要渲染图标时使用 Icon类当要渲染 CircleFeature时使用CircleStyle类
详见文章【OpenLayers 图文标注大全】:
// 图表样式iconStyle
const iconStyle = new ol.style.Style({
    image: new ol.style.Icon({
        src: "../../image/map.jpg",
        scale: [1 / 16, 1 / 16],
    }),
})
// CircleFeature样式CircleStyle
const featureStyle = new ol.style.Style({
    image: new ol.style.Circle({
        radius: 10,
        fill: new ol.style.Fill({
            color: "#fff"
        }),
        stroke: new ol.style.Stroke({
            color: "red"
        })
    })
})
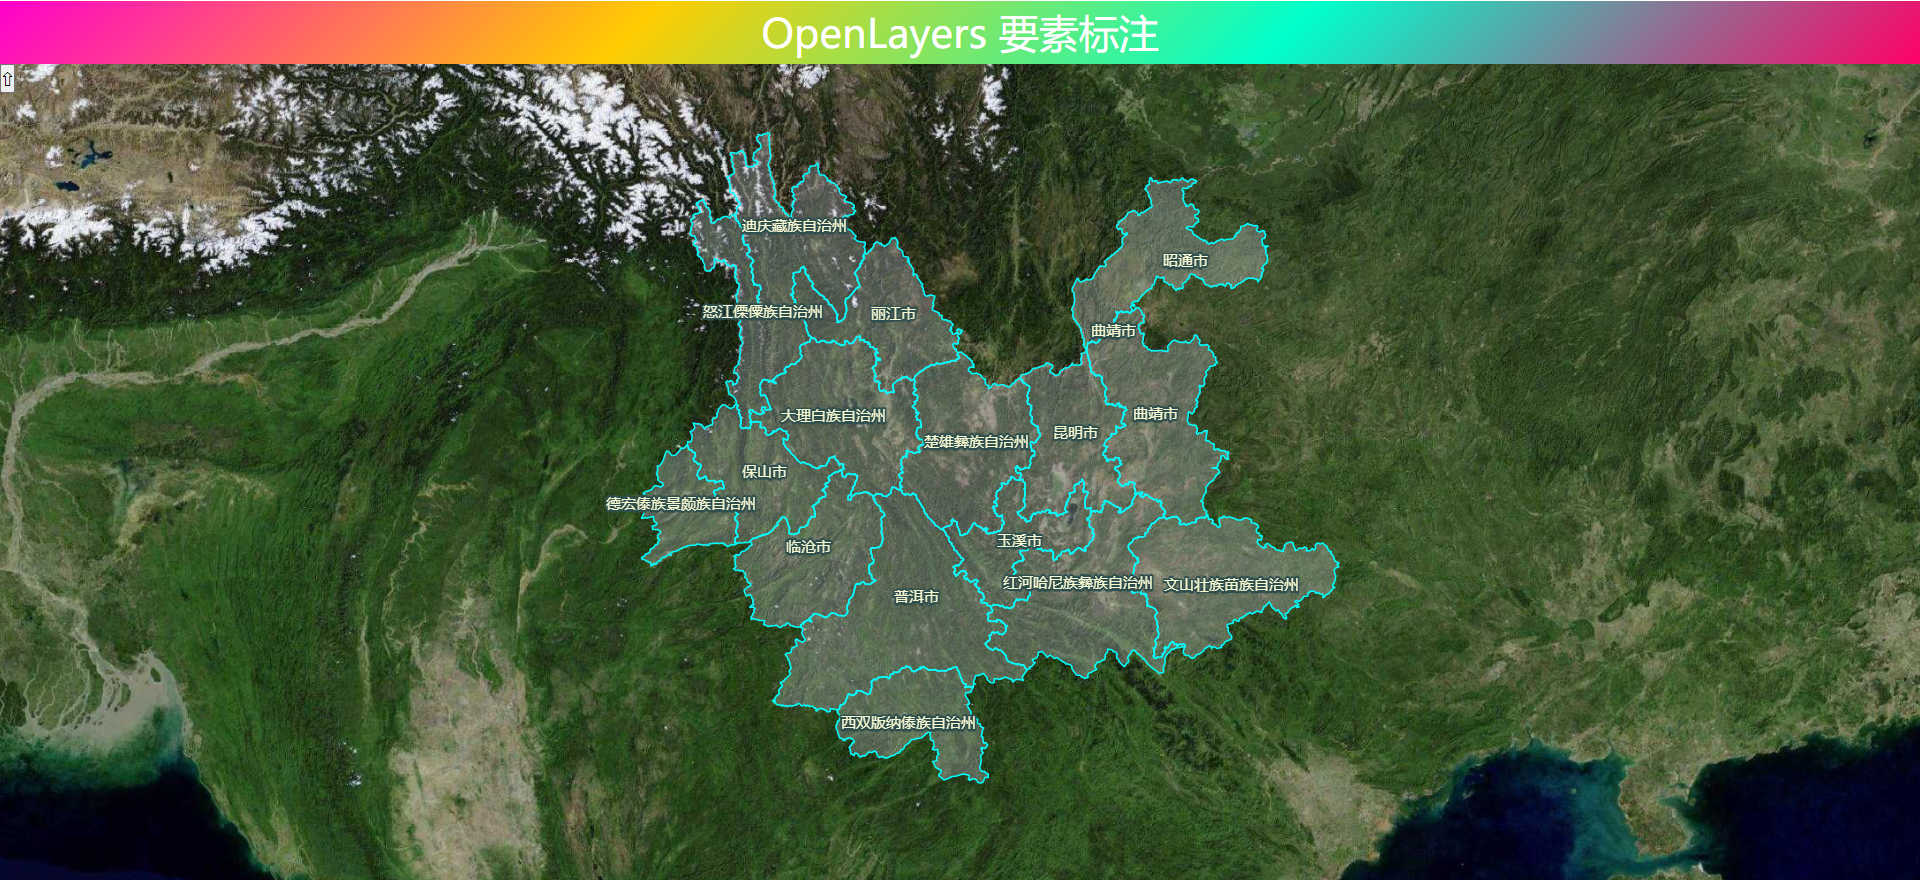
3.5. text属性
text属性主要用于设置矢量要素文本样式,如图层标注功能。Text对象具有很多属性,font属性可以设置字体样式、offsetX|offsetY属性设置字体偏移、textAlign属性设置文本框居中显示、justify属性设置文本框文本内容居中样式,等等。
详见文章【OpenLayers 要素标注】:
// 文字样式
const labelStyle = new ol.style.Style({
    text: new ol.style.Text({
        text: "标注文本",
        font: '12px Calibri,sans-serif',
        textAlign: "center",
        overflow: true,
        // 填充色
        fill: new ol.style.Fill({
            color: "#FAFAD2"
        }),
        // 描边色
        stroke: new ol.style.Stroke({
            color: "#2F4F4F",
            width: 3,
        })
    })
})
❝
OpenLayers示例数据下载,请在公众号后台回复:ol数据
全国信息化工程师-GIS 应用水平考试资料,请在公众号后台回复:GIS考试
❝
GIS之路公众号已经接入了智能助手,欢迎大家前来提问。
欢迎访问我的博客网站-长谈GIS:
http://shanhaitalk.com
都看到这了,不要忘记点赞、收藏+关注 哦!
本号不定时更新有关 GIS开发 相关内容,欢迎关注