^ 关注我,带你一起学GIS ^
注:当前使用的是 ol [9.2.4] 版本,天地图使用的key请到天地图官网申请,并替换为自己的key
 前言
前言
❝最近,在
OpenLayers官网看到一个有趣的例子,通过在地图上生成一些随机点,然后利用三角算法使这些点进行周期运动。
1. 生成点样式
在例子中给随机点设置填充和边线样式,同时为了区分顶点和其它随机点的样式,给顶点设置呢内部填充样式和外部填充样式。
// 点样式
const imageStyle = new ol.style.Style({
    image: new ol.style.Circle({
        radius: 5,
        fill: new ol.style.Fill({
            color: 'yellow'
        }),
        stroke: new ol.style.Stroke({
            width: 1,
            color: 'red'
        })
    })
})
// 顶点内部样式
const headInnerImageStyle = new ol.style.Style({
    image: new ol.style.Circle({
        radius: 2,
        fill: new ol.style.Fill({
            color: "blue"
        })
    })
})
// 顶点外部样式
const headOuterImageStyle = new ol.style.Style({
    image: new ol.style.Circle({
        radius: 5,
        fill: new ol.style.Fill({
            color: "black"
        })
    })
})
2. 生成随机点
监听天地图影像图层postrender事件,在其事件对象中获取矢量上下文。其中用到了渲染对象render方法getVectorContext,该方法返回对象为VectorContext类的子类CanvasImmediateRenderer。CanvasImmediateRenderer类实现了将要素和几何对象直接渲染到HTML5 Cavas上下文。该类的实例在库内部创建,并且与图层和地图抛出的渲染事件potscompose(后合成)、precompose(预合成)相关联。
const n = 100 // 随机点数量
const omegaTheta = 30000 // 旋转周期,单位ms
const R = 6e6
const r = 2e6
const p = 2e6

TDTImgLayer.on("postrender", event => {
    console.log("event:", event)
    const vectorContext = ol.render.getVectorContext(event)
    let frameState = event.frameState
    const theta = (2 * Math.PI * frameState.time) / omegaTheta
    const coordinates = []
    for (let i = 0; i < n; ++i) {
        // 角度
        const t = theta + (2 * Math.PI * i) / n
        // 生成x,y坐标
        const x = (R + r) * Math.cos(t) + p * Math.cos(((R + r) * t) / r)
        const y = (R + r) * Math.sin(t) + p * Math.sin(((R + r) * t) / r)
        coordinates.push([x, y])
    }
    // 渲染点样式
    vectorContext.setStyle(imageStyle)
    vectorContext.drawGeometry(new ol.geom.MultiPoint(coordinates))
    // 渲染顶点外部样式
    const headPoint = new ol.geom.Point(coordinates[coordinates.length - 1])
    vectorContext.setStyle(headOuterImageStyle)
    vectorContext.drawGeometry(headPoint)
    // 渲染顶点内部样式
    vectorContext.setStyle(headInnerImageStyle)
    vectorContext.drawGeometry(headPoint)
    // 渲染图层
    map.render()
})
map.render()
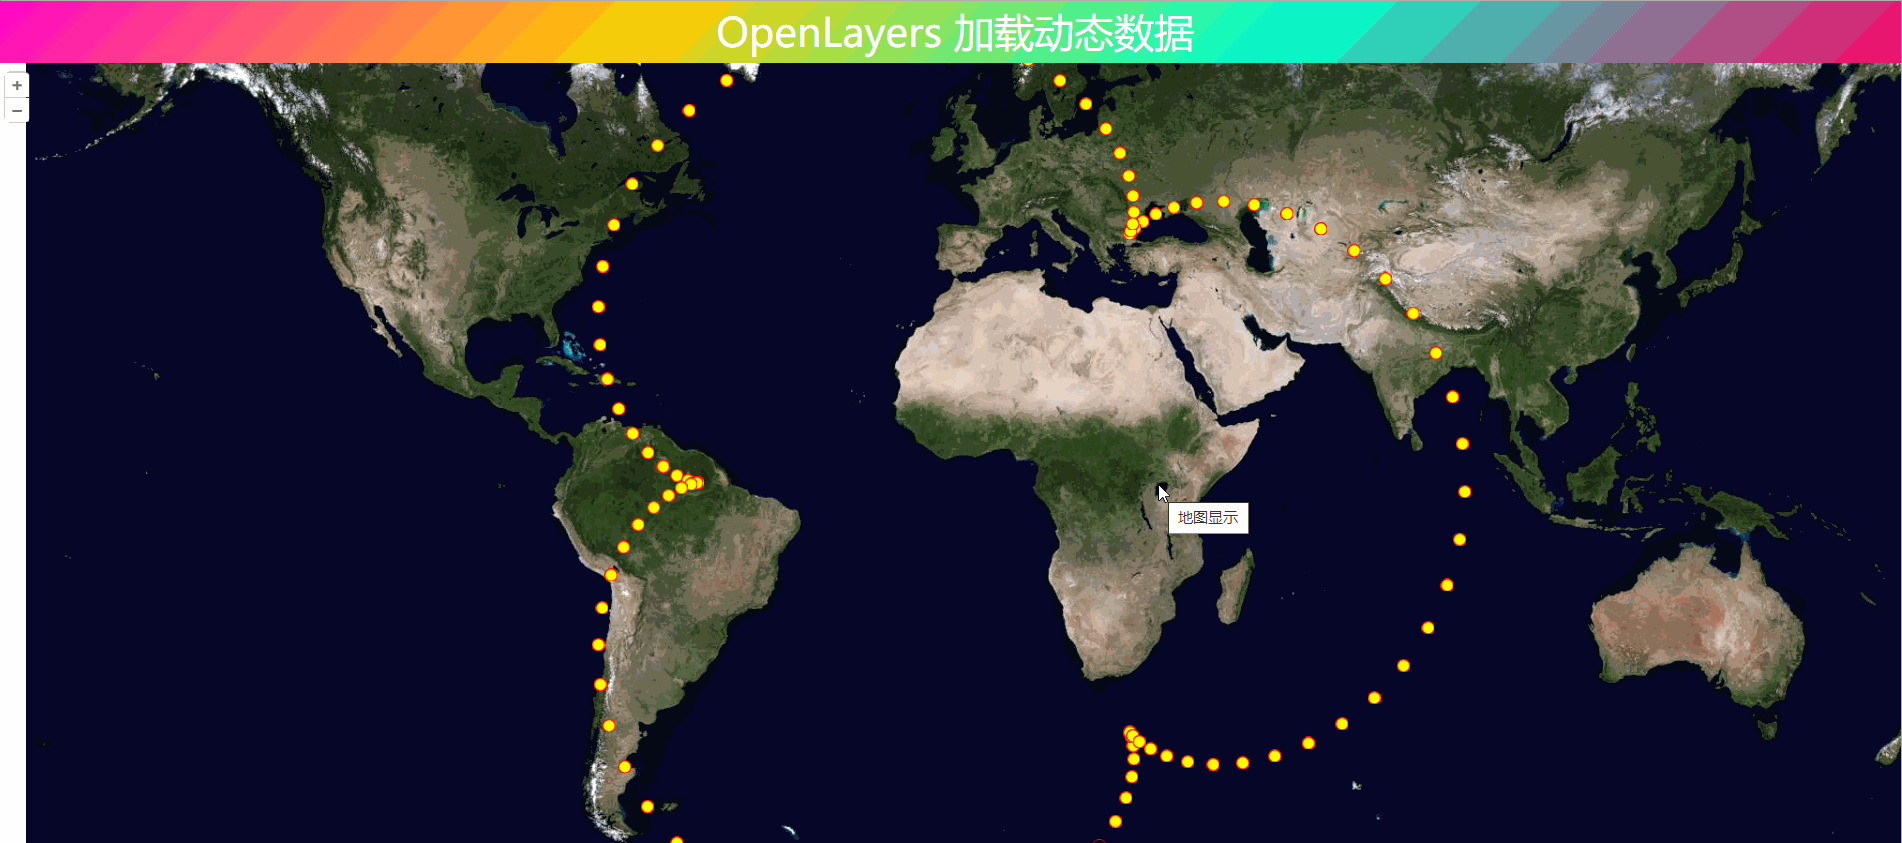
3. 动态效果图
例子原始算法
// 角度
const t = theta + (2 * Math.PI * i) / n
const x = (R + r) * Math.cos(t) + p * Math.cos(((R + r) * t) / r)
const y = (R + r) * Math.sin(t) + p * Math.sin(((R + r) * t) / r)
圆形运动
// 角度
const t = theta + (2 * Math.PI * i) / n
const x = (R + r) * Math.cos(t)
const y = (R + r) * Math.sin(t)
随机运动
// 角度
const t = theta + (2 * Math.PI * i) / n
const x = (R + r) * Math.cos(Math.PI * Math.random() * 100000)
const y = (R + r) * Math.sin(Math.PI * Math.random() * 100000)
线型运动
// 角度
const t = theta + (2 * Math.PI * i) / n
const x = (R + r) * Math.cos(Math.PI / 2)
const y = (R + r) * Math.sin(t)

4. 完整代码
其中libs文件夹下的包需要更换为自己下载的本地包或者引用在线资源。
<!DOCTYPE html>
<html>

<head>
    <meta http-equiv="Content-Type" content="text/html; charset=utf-8" />
    <title>OpenLayers 加载动态数据</title>
    <meta charset="utf-8" />

    <link rel="stylesheet" href="../../libs/css/ol9.2.4.css">

    <script src="../../js/config.js"></script>
    <script src="../../libs/js/ol9.2.4.js"></script>
    <style>
        * {
            padding: 0;
            margin: 0;
            font-size: 14px;
            font-family: '微软雅黑';
        }

        html,
        body {
            width: 100%;
            height: 100%;
        }

        #map {
            position: absolute;
            top: 50px;
            bottom: 0;
            width: 100%;
        }

        #top-content {
            position: absolute;
            width: 100%;
            height: 50px;
            line-height: 50px;
            background: linear-gradient(135deg, #ff00cc, #ffcc00, #00ffcc, #ff0066);
            color: #fff;
            text-align: center;
            font-size: 32px;
        }

        #top-content span {
            font-size: 32px;
        }
    </style>
</head>

<body>
    <div id="top-content">
        <span>OpenLayers 加载动态数据</span>
    </div>
    <div id="map" title="地图显示"></div>
</body>

</html>

<script>
    //地图投影坐标系
    const projection = ol.proj.get('EPSG:3857');
    //==============================================================================//
    //============================天地图服务参数简单介绍==============================//
    //================================vec:矢量图层==================================//
    //================================img:影像图层==================================//
    //================================cva:注记图层==================================//
    //======================其中:_c表示经纬度投影,_w表示球面墨卡托投影================//
    //==============================================================================//
    const TDTImgLayer = new ol.layer.Tile({
        title: "天地图影像图层",
        source: new ol.source.XYZ({
            url: "http://t0.tianditu.com/DataServer?T=img_w&x={x}&y={y}&l={z}&tk=" + TDTTOKEN,
            attibutions: "天地图影像描述",
            crossOrigin: "anoymous",
            wrapX: false
        })
    })
    const TDTImgCvaLayer = new ol.layer.Tile({
        title: "天地图影像注记图层",
        source: new ol.source.XYZ({
            url: "http://t0.tianditu.com/DataServer?T=cia_w&x={x}&y={y}&l={z}&tk=" + TDTTOKEN,
            attibutions: "天地图注记描述",
            crossOrigin: "anoymous",
            wrapX: false
        })
    })
    const map = new ol.Map({
        target: "map",
        loadTilesWhileInteracting: true,
        view: new ol.View({
            // center: [102.845864, 25.421639],
            center: [0, 0],
            zoom: 2,
            worldsWrap: false,
            minZoom: 1,
            maxZoom: 20,
            // projection: 'EPSG:4326',
        }),
        layers: [TDTImgLayer]
    })

    // 点样式
    const imageStyle = new ol.style.Style({
        image: new ol.style.Circle({
            radius: 5,
            fill: new ol.style.Fill({
                color: 'yellow'
            }),
            stroke: new ol.style.Stroke({
                width: 1,
                color: 'red'
            })
        })
    })
    // 顶点内部样式
    const headInnerImageStyle = new ol.style.Style({
        image: new ol.style.Circle({
            radius: 2,
            fill: new ol.style.Fill({
                color: "blue"
            })
        })
    })
    // 顶点外部样式
    const headOuterImageStyle = new ol.style.Style({
        image: new ol.style.Circle({
            radius: 5,
            fill: new ol.style.Fill({
                color: "black"
            })
        })
    })

    const n = 100 // 随机点数量
    const omegaTheta = 30000 // 旋转周期,单位ms
    const R = 6e6
    const r = 2e6
    const p = 2e6
    TDTImgLayer.on("postrender", event => {
        console.log("event:", event)
        const vectorContext = ol.render.getVectorContext(event)
        let frameState = event.frameState
        const theta = (2 * Math.PI * frameState.time) / omegaTheta
        const coordinates = []
        for (let i = 0; i < n; ++i) {
            // 角度
            const t = theta + (2 * Math.PI * i) / n
            // 生成x,y坐标
            const x = (R + r) * Math.cos(t) + p * Math.cos(((R + r) * t) / r)
            const y = (R + r) * Math.sin(t) + p * Math.sin(((R + r) * t) / r)
            coordinates.push([x, y])
        }
        // 渲染点样式
        vectorContext.setStyle(imageStyle)
        vectorContext.drawGeometry(new ol.geom.MultiPoint(coordinates))
        // 渲染顶点外部样式
        const headPoint = new ol.geom.Point(coordinates[coordinates.length - 1])
        vectorContext.setStyle(headOuterImageStyle)
        vectorContext.drawGeometry(headPoint)
        // 渲染顶点内部样式
        vectorContext.setStyle(headInnerImageStyle)
        vectorContext.drawGeometry(headPoint)
        // 渲染图层
        map.render()
    })
    map.render()
</script>
❝
OpenLayers示例数据下载,请在公众号后台回复:ol数据
全国信息化工程师-GIS 应用水平考试资料,请在公众号后台回复:GIS考试
❝
GIS之路公众号已经接入了智能助手,欢迎大家前来提问。
欢迎访问我的博客网站-长谈GIS:
http://shanhaitalk.com
都看到这了,不要忘记点赞、收藏+关注 哦!
本号不定时更新有关 GIS开发 相关内容,欢迎关注